A timeline layout can come in handy for a lot of different applications on a website, especially if it looks great on mobile. You can use it for showcasing a sequence of milestones on an about page, featuring the steps of a process, and much more. With Divi scroll effects, you can make a timeline design come alive!
In this tutorial, we’ll show you how to design a stylish illustrated Divi timeline layout with fixed imagery and scroll effects. The timeline layout is versatile, playful, and responsive. And, the scroll effect features a fixed car that drives through an illustrated street, without any additional CSS required!
Sneak peek
To achieve this Divi scroll effects enabled timeline, we first create a new page, adding a regular section containing a three column row.
The left and right-hand columns will feature the animated text modules, with the middle column featuring a fixed/static image which sticks to the page as the user scrolls. In our example we have used a sports car PNG to drive down an illustrated street, however, any ‘birds-eye-view’ image will work here.
First, let’s create the animated text boxes that utilise Divi scroll effects.
Simply add a new text box to the left-hand column and enter the text you need. For the design, we will want to add a background colour so that the text is legible when placed above an image. We will also need to apply some padding and a box shadow to allow the text to pop. We used a background colour of #f7f9fe, equal padding of 20px and a light box shadow. You will also notice we have added an optional border to the bottom of the text module.
Divi Scroll Effects Set Up Example
Next, we want to apply the Divi scroll effects. We are using two scroll effects here – ‘Horizontal Motion’ and ‘Fading In and Out’. See below for the setting for the left-hand text modules.
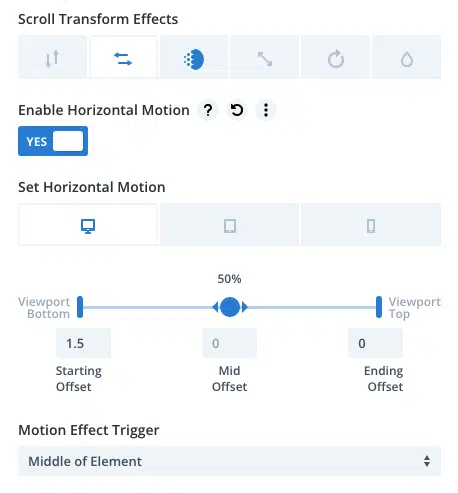
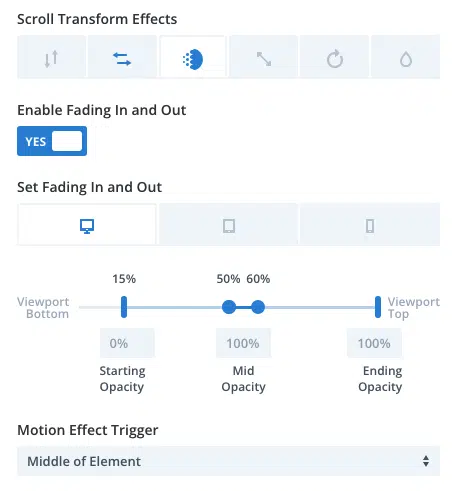
Please note that we have disabled the scroll effects for tablets and mobile.
Once you are happy with your text module design, copy the module over to the right-hand column. The text module design will remain the same, however, the Divi scroll effects will change slightly. Please see the right-hand scroll effects settings below.
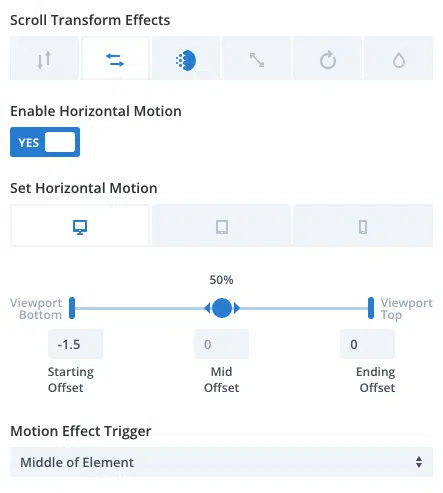
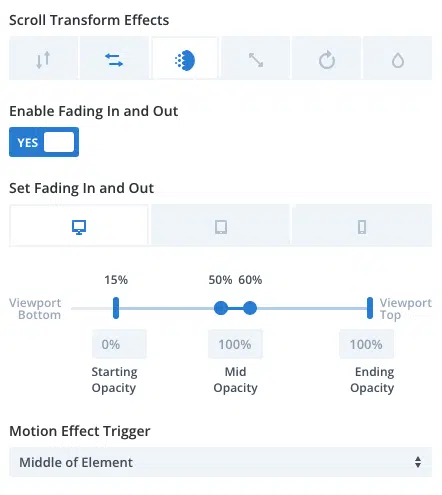
Your text modules are now complete and you can duplicate these as many times as you wish. Please note that the first text modules for both left and right-hand columns may require additional top margins to position them correctly. We used a top margin of 400px.
Let’s get started on the fixed car!
Selecting the middle column, add a new image module and upload a png image of your choice. You will need to ensure the image is set to center align, with a width of around 70px. We added a slight shadow to the image to give the car a more 3D look and feel.
Now, select the image module advanced tab and open ‘Scroll effects’ to enable the sticky position. Use the settings below for optimum effect.
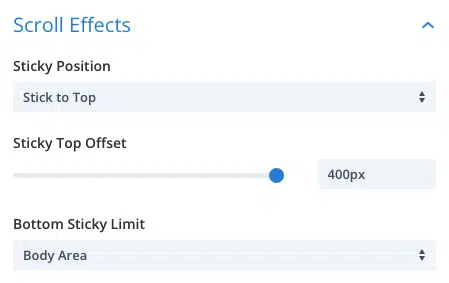
Please note that all other scroll effects can be left as their default settings.
You should now have a fixed car that sticks to the screen when you scroll. The left and right-hand text modules should fade in and push away from the car as the car passes.
Finally, let’s add a section background to complete the timeline. We chose an illustrated approach, however, you could use any birds-eye-view straight road of your choice. You may wish to simply use a line for a more elegant approach. Whatever you choose, you will need to produce an image of 1920px wide and we recommend a height of 3000px (this is dependent on the number of text modules you need). We also found that fading the background image around the edges allowed the text boxed to be more easily read.
There you have it! A fun and unique timeline, utilizing Divi scroll effects. You can now get creative by duplicating the section and replacing the background images to create a bridge/sea section, as seen in our example.
Please feel free to download our template for your own project (no additional CSS required!)


